I tried Brow Lamination for the first time for fuller, bolder brows
What is Brow Lamination?
Brow lamination is essentially a brow lift. How it works is that it redirects the direction of brow hairs so that it gives the eyebrows a fuller and fluffier look! This look is achieved by using a treatment that is similar to lash lifting that lasts 4-8 weeks and eliminates the hassle of filling them every day. After the brow lamination, your brows will be left looking picture-perfect; they will look thicker, straighter, and more full, giving you your ideal brow.
When I started my research, I wanted to learn more about what the process looked like, what kind of treatments they use, and if there were any harsh chemicals involved. I found that most studios used a solution that is pretty much the same as hair perm … yikes! This steered me away as I did not want to fry my thin eyebrows off. I was happy to see that Keravie uses a safer brow treatment without some of the harsh chemicals that other studios use. That being said, with any treatment like this where adhesives are being applied to the brows aftercare is extremely important to hydrate the brows in order to maintain the lift.
Why I decided to get a Brow Lamination…
After seeing the hype about brow lamination for months I decided it would be a great time to give it a try. As someone who would religiously wax and tweeze their eyebrows since they were a teenager, I needed something that would give life to my thin sparse brows. I wasn’t ready to take the plunge and get a permanent solution like microblading, but I also wanted to try something that would make my life easier by not having to fill my brows in every day. Brow lamination intrigued me because of the fluffiness and fullness that can be achieved with one single treatment!
The look that I wanted for my brow lamination was to get the shape that I have when I pencil them in but with more definition in the individual hairs (to look more like microblading). As far as my makeup routine goes I am a strict gel and pencil kind of gal so I was intrigued to see what the final look of the lamination would be for my brows.
I went into the brow lamination hoping for something a little less dramatic as I didn’t want my eyebrows to look too bushy like some of the treatments I had seen while searching online. I did find a couple of photos for inspiration and what kind of look I was going for.

This is my daily brow makeup before lamination
The Brow Lamination Process
The process of the lamination was quick, painless, and quite relaxing.
- The treatment begins with an in-depth consultation that went over the process of the treatment, the style and look desired for the eyebrows and any other questions or concerns.
- A barrier cream is put around the eyes to protect the edges around the eyebrows to keep any unwanted colour from the tint or serum from the treatment.
- A lift adhesive is applied to the eyebrows to help treat them into place and align the hairs in an upward direction.
- A setting solution is placed on the brows in order to process the hairs and ensure they stay in the desired place.
- Next, the artist maps the brows to ensure proper shape and waxes the brows to get rid of any unwanted hair. Keravie uses a hard wax which definitely lessens the pain of waxing because it only adheres to the hair and not the skin.
- Tinting the brows is the next step to give them a bold finished look.
- The GEL Organic Lash and Brow Botox is applied to nourish and hydrate the brow hairs.
- A setting oil is then applied that helps keep the lamination in place and keep the brows in the direction that was achieved during the treatment.
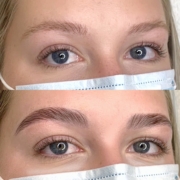
The Result!
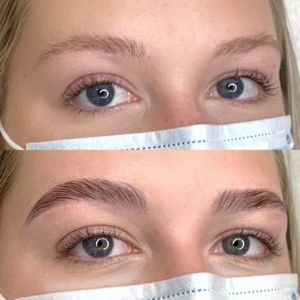
My brow lamination before and after
Step-by-Step Video on my Brow Lamination
I was in awe of what my brows looked like after the treatment, My artist Chelsea did an amazing job. They had never in my life looked so perfectly shaped, full, and bold. The process overall was very relaxing and the result of the brow lamination was everything I was hoping for. My brows looked like they had been perfectly penciled in and I could see the hairs at the tip of my brows for once. The tint with the lamination was the perfect combo for my light non-existent brows. I am hooked!
After the Treatment
The morning after the service I woke up to perfect eyebrows for the first time in my life. All I had to do to be brow ready was to brush them into place … and voila, they were perfect! Personally, I think one of the best aspects of their service was how dark and full my brows looked, considering that without makeup the blonde hairs looked almost non-existent. The service also added convenience into my morning beauty routine as it shaved off about 15 minutes that I would usually dedicate to my brows.
For those with darker hair, you can opt-out from the tint, but for those like me (lighter haired ladies), I highly recommend it. I have never had anything semi-permanent on my eyebrows and it felt amazing to have brows that are prominent and bold on my face.
The GEL Keratin Lash and Brow Mascara is also recommended for aftercare to nourish and strengthen your brow hairs after treatment. It also helps to style them too for an added bonus!

My brows 2 weeks after the lamination with a bit of brow pencil
Final Thoughts
If you are like me and aren’t ready to permanently change your brows but want to add some oomph, brow lamination is the way to go! A good idea is to bring some pictures into the studio for inspiration in order to get a look that suits you. Finally, a holy grail I recommend grabbing is to pick up some of the GEL Keratin Mascara (yes I said mascara) once the treatment is complete. Amazingly, this mascara actually doubles as a great eyebrow serum for the night time as it strengthens and nourishes those brows. You can grab the mascara here!
If this looks like a service you need done you can book one for yourself here!