The Dreaded Fall Lash Shed; Yes, it’s real and it’s coming in hot!
There is something about the fall that we all love and look forward to! The smell in the air, walking through crunchy leaves, Pumpkin Spice, comfy sweaters, and cute booties! But there’s one thing about the fall that we all dread…
So, we all know our lashes shed daily right? As all the hair on our body does. But why does it seem as though we lose more lashes in the Autumn months and are finding ourselves struggling to make it to a 2-week fill when we can usually surpass a 3-week fill? Well, I spent some time doing some research and diving deeper into the cycles of hair shedding and many other contributing factors so that I can tell you exactly why (you’re welcome)! I will discuss how our lashes grow and shed some causes of the Fall Lash Shed, and some key things you can do during this dreaded cycle change to maintain optimal lash health!
Let’s start with some lash growth basics:
To really understand why our lashes are falling out, we need to first understand how they grow!
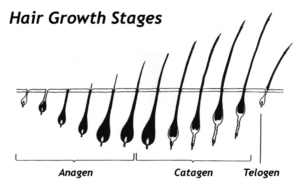
- The lash growth cycle begins with the growth phase (Anagen); this is when those pesky baby lashes begin to grow from the hair follicles. These little guys will almost never have an extension placed on them as they are far too short and weak to properly support an extension.
- The second stage in the lash growth cycle is the transition phase or the Catagen phase. This is the “teenage” point of the lash cycle. These guys can usually be strategically lashed, depending on where they are within this phase.
- The final stage before the lashes shed is the resting or Telogen phase. These are the adult lashes; these are the ones we love! These lashes can hold extensions with no problem (given the appropriate length and diameters are chosen).
Sounds a little confusing right? Well, I’ve included a couple of pictures to clear it all up for you!
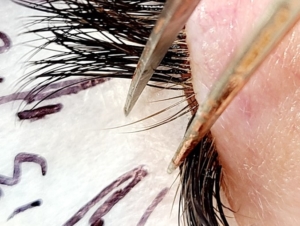
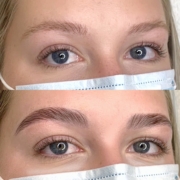
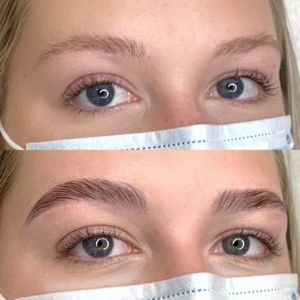
This is a picture taken last week of a client of mine to show an example of lashes in their different growth stages. Here you can see the Anagen, Catagen, and Telogen phases.
What is normal lash shedding and what is abnormal shedding?
We always explain to our clients that they can expect to lose anywhere from 2-5 lashes a day due to normal shedding. The exception comes during our lovely fall shed (and sometimes spring too). However, this change in the lash cycle will only last a few weeks so no need to fret! Abnormal shedding would be any excessive, worrisome amounts of lashes coming out, and this can be due to many issues such as Alopecia and other severe health issues.
Ok, ok, so really, what DOES cause this “Fall Lash Shed” I have been talking about?
Well as a Lash Artist, it’s always been a phenomenon that we have known about and discussed with our clients, but I really wanted to understand WHY this happens. So, I did some research. I spent time reading blogs posted from other lash artists and studios, I have read the information on health and beauty websites, and even dug into academic medical journals and here are the top 3 reasons I’ve discovered.
1. Vitamin D! Vitamin D plays a big part in our skin and hair. It stimulates the hair follicles to encourage the Anagen phase which keeps our lashes growing long and strong! And the biggest source of our vitamin D is good ol’ Mr. Sun! Unfortunately for us in Canada, our hours of sun in a day quickly dwindle as we enter the Autumn months. As I am sure almost all of you reading can attest to this, it’s dark when we leave for school/work and it’s dark when we leave for home. So, we really do not have very much sun exposure; this leads to a vitamin D deficiency, which then stunts the growth cycle of our lashes (and our hair), contributing to Fall Lash Shed.
2. Humidity! Along with the cooler temperatures comes dehydration. Yup–we all know exactly what I’m talking about! Dry cracked hands, eczema flairs, and forever thirsty. The lack of humidity in the air has a serious effect on our epidermis (fancy work for skin; have I impressed you yet?). This lack of moisture and humidity causes the lashes to become more brittle which means our lashes are more prone to premature breaking and shedding.
3. It’s Summer’s fault! I found that there is evidence that suggests that this crazy cycle begins in summer. Our lashes and skin are flourishing with vitamin D and hydration during the summer months so during this time there’s actually an increase in the growth of our lashes and because they are so happy that they tend to hang out in the Telogen Phase for a little bit longer. This actually increases in the number of adult lashes present on our lash line. So, when the drastic change occurs over the Autumn months, all those extra happy and healthy adult lashes tend then shed out. And Voila! The Fall Lash Shed!
How do you manage life during the Fall Lash Shed?
Now, you may not be able to prevent this Fall Lash Shed from happening, but there are a few things that you can do during these stressful times for your lashes. This I cannot stress enough:
1. WASH YOUR LASHES!
This is super important, not only during this season but all-year-round! However, during this time, because our skin is so dry, I always see an excess build-up of skin in and around clients lashes so washing them is super important. If they are not properly washed, it can lead to infections and even worse things (which we will save likely for another blog topic). The best thing to use is an oil-free foaming cleanser, and a soft brush.

If you’re in a panic and can’t find some, or you forget to pick some up during your appointment don’t worry! We offer free shipping in Alberta!
2. BE PROACTIVE AND BOOK AHEAD!
Talk with your lash artist and determine the best game plan when it comes to booking your fills. You may be someone who can easily go 3 weeks between fills, but during this Fall Lash Shed we recommend booking 2 weeks instead. It is likely you will have less lash-able lashes during the shed so this will help to ensure your lashes are looking as beautiful and full as we can get them! I know we all live crazy busy lives but luckily for you (and us) our online booking system is a life-saver!
3. EMBRACE THE OPPORTUNITY: TAKE A BREAK!
This time can be very frustrating for clients since their lashes are not behaving as they normally would. But another option would be to just embrace the Fall Shed, let your lashes have a break and get a removal. I know… I said it… the “R” word, but just hear me out. None of us can truly get by without lashes, especially now during the COVID face mask era, our eyes are all anyone sees!
BUT we have solutions for you if a break from extensions is what you are leaning toward during the Fall Lash Shed:
- Try a growth serum! This will help you get through your lash shed a little bit faster. We swear by Eyenvy at Keravie! It works by stimulating the lash follicles to encourage a longer growth phase. Skeptical? Check out our previous blog post that tells you everything you need to know about Eyenvy, and has some great before and after photos!
- One word: LASHOCRACY. We’ve stepped up the strip-lash game! These must haves are glueless, vegan, reusable, hypoallergenic AND hella cute. What more could you want!? Trust me, you are going to want to check them out!
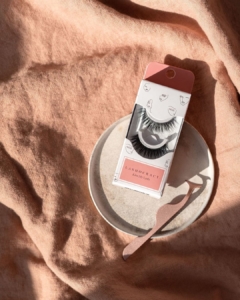
Lashocracy Glueless Strip Lashes
5. Lastly, DON’T PANIC!
If you take anything away from this, know that this excess shedding is normal, and we are here for you! Just stay hydrated, healthy, and happy and we will get through the dreaded Fall Lash Shed together!